As a home designer, I believe that our living spaces should be an extension of our personalities, reflecting our unique styles and life journeys. But creating a truly personalized and inviting environment doesn’t have to break the bank. With a little creativity and some DIY spirit, you can transform your living room into a cozy sanctuary that tells your story through budget-friendly wall art projects.
From the intricate knots of macrame wall hangings to the vibrant hues of DIY canvas paintings, this article will guide you through a world of possibilities, empowering you to unleash your inner artist and infuse your space with warmth, texture, and individuality. Whether you’re a seasoned crafter or a beginner looking to explore your creative side, these projects offer a delightful blend of functionality and self-expression, allowing you to create pieces that not only elevate your decor but also serve as conversation starters and cherished mementos.
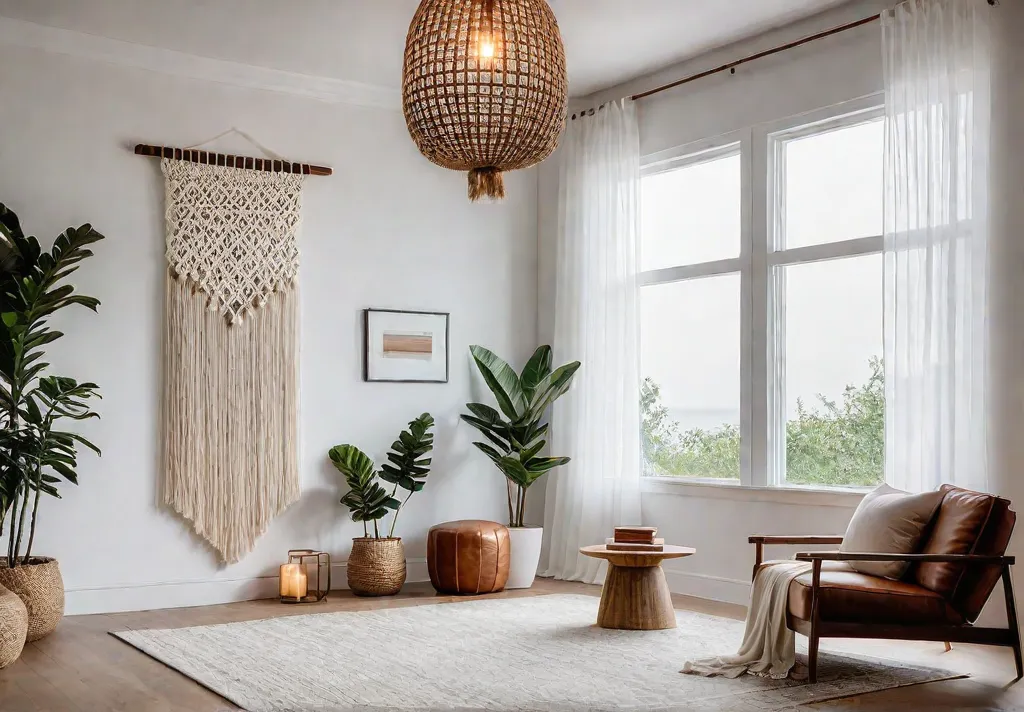
Create Warmth with Macrame Wall Hangings
Macrame, the art of knotting cords into intricate patterns, is a budget-friendly and trendy way to add texture and warmth to your living room. Not only are these woven wall hangings visually appealing, but they also carry a rich cultural history dating back to the 13th century.
Choosing the Right Cord and Patterns
The beauty of macrame lies in its versatility. You can find affordable macrame cords in a variety of materials, from classic cotton to modern metallic accents, to create a piece that perfectly complements your living room’s aesthetic. For a cozy, bohemian vibe, opt for a chunky cotton cord in earthy tones. If you prefer a more glamorous look, try a shimmery cord with metallic threads woven throughout.
When it comes to patterns, start with simple designs for beginners, such as the classic plant hanger or a basic wall hanging. As you gain confidence, you can experiment with more intricate patterns and incorporate elements like beads, tassels, or even driftwood for a unique touch.
Simple Macrame Knots for Beginners
Don’t be intimidated by the seemingly complex knots – macrame is surprisingly easy to learn! Start by mastering a few basic knots, such as the lark’s head knot, square knot, and half-hitch knot. These knots form the foundation for most macrame patterns, and with a little practice, you’ll be creating beautiful wall hangings in no time.
- Lark’s Head Knot: This knot is used to attach the cord to a ring or dowel, creating a sturdy base for your macrame project.
- Square Knot: As the name suggests, this knot creates a square shape and is commonly used to create patterns and designs.
- Half-Hitch Knot: This simple knot is often used to secure the ends of the cords or to create decorative fringes.
Once you’ve mastered these essential knots, you can find a wealth of free macrame patterns online or in craft books to guide you through creating your very own masterpiece.
Hanging Your Macrame Art
When it comes to displaying your handmade macrame wall hanging, the possibilities are endless. Hang it above a sofa or fireplace for a cozy, bohemian touch, or let it serve as a focal point on an empty wall. If your macrame piece is particularly heavy, be sure to use a sturdy hanging rod or dowel and secure it properly to the wall.
Remember, the beauty of macrame lies in its imperfections – embrace the unique character of each knot and let your creativity shine through!
Transitioning into the next section, we’ll explore another budget-friendly and artistic way to personalize your living room.
Unleash Your Inner Artist with DIY Canvas Paintings
As a designer, I believe that art has the power to transform a space, infusing it with personality and creating an inviting ambiance. And what better way to add a personal touch to your living room than with a DIY canvas painting? Don’t be intimidated – you don’t need to be a professional artist to create a stunning piece of wall art that reflects your unique style.
Choosing a Painting Technique and Style
The beauty of DIY canvas paintings lies in their versatility. Whether you’re drawn to the bold strokes of abstract expressionism or the serene landscapes of impressionism, there’s a style to suit every taste. For beginners, abstract art and geometric patterns are excellent starting points, allowing you to explore color, texture, and composition without the constraints of realism.
Creating a Focal Point and Adding Dimension
As you embark on your canvas painting journey, consider incorporating techniques that add depth and visual interest to your artwork. For instance, using a contrasting color or metallic accents can create a striking focal point, drawing the eye and adding a touch of sophistication. Textured mediums like modeling paste or sand can also lend a tactile quality to your painting, inviting viewers to appreciate the intricate details.
Remember, the key to a successful DIY canvas painting is to have fun with the process. Experiment with different brushstrokes, color combinations, and techniques until you find a style that resonates with you. Don’t be afraid to step outside your comfort zone – sometimes the most unexpected results can lead to the most captivating pieces.
One of the great joys of creating your canvas art is the ability to customize it to your living space. Consider incorporating colors and patterns that complement your existing decor, or use your painting as a starting point for a fresh, vibrant design scheme.
While canvas paintings offer a canvas (pun intended) for your artistic expression, fabric wall hangings provide a unique opportunity to add depth and texture to your living room. In the next section, we’ll explore how these versatile pieces can transform your space, infusing it with warmth and personality.
Fabric Wall Hangings: Bringing Texture and Color to Your Space
Fabric wall hangings are a versatile and budget-friendly way to add depth, texture, and personality to your living room. These DIY pieces not only serve as eye-catching works of art but also offer a unique opportunity to repurpose leftover fabric scraps, vintage textiles, or even patterned tea towels.
Selecting Fabrics and Creating a Cohesive Design
The beauty of fabric wall hangings lies in their ability to blend various patterns, colors, and textures into a harmonious composition. Start by gathering an assortment of fabrics that speak to your style and the existing color scheme of your living room. Consider incorporating fabrics with different weights and textures, such as lightweight cotton, cozy wool, or even shimmery silks, to create a visually interesting and tactile piece.
If you’re working with multiple fabric pieces, arrange them on the floor or a flat surface to experiment with different layouts and color combinations. Play with contrasting patterns and complementary hues to create a balanced and cohesive design that reflects your creativity.
Different Hanging Techniques for Unique Looks
Once you’ve settled on your fabric selection and design, it’s time to explore various hanging techniques. One of the simplest methods is to use embroidery hoops or wooden dowels to frame your fabric pieces. This approach not only adds a rustic charm but also allows you to easily switch out fabrics whenever you desire a fresh look.
For a more minimalist aesthetic, consider hanging fabric panels directly on the wall using adhesive strips or small nails. This technique works particularly well with larger pieces of fabric, transforming them into striking statement pieces.
Alternatively, you can create a patchwork design by sewing or adhering smaller fabric scraps onto a larger backing fabric. This method allows you to incorporate a wide range of patterns and textures into a single cohesive piece, resulting in a truly one-of-a-kind wall hanging.
Embellishments and Finishing Touches
To add even more visual interest and texture to your fabric wall hangings, consider incorporating embellishments such as fringes, tassels, or beads. These details not only enhance the overall design but also add a touch of whimsy and playfulness to your living space.
For a more dynamic display, hang a series of fabric panels at varying heights, creating a visually striking and layered effect. This technique is particularly effective when using fabrics with different patterns or colors, as it allows each piece to stand out while still contributing to the overall composition.
Remember, fabric wall hangings are meant to be enjoyed and admired, so don’t be afraid to experiment with different designs and techniques until you find the perfect combination that resonates with your style and brings joy to your living room.
Fabric wall hangings offer a unique opportunity to infuse your living room with texture, color, and personal flair. By repurposing fabrics and exploring various hanging techniques, you can create a truly one-of-a-kind piece that not only adds visual interest but also reflects your creativity and individuality.
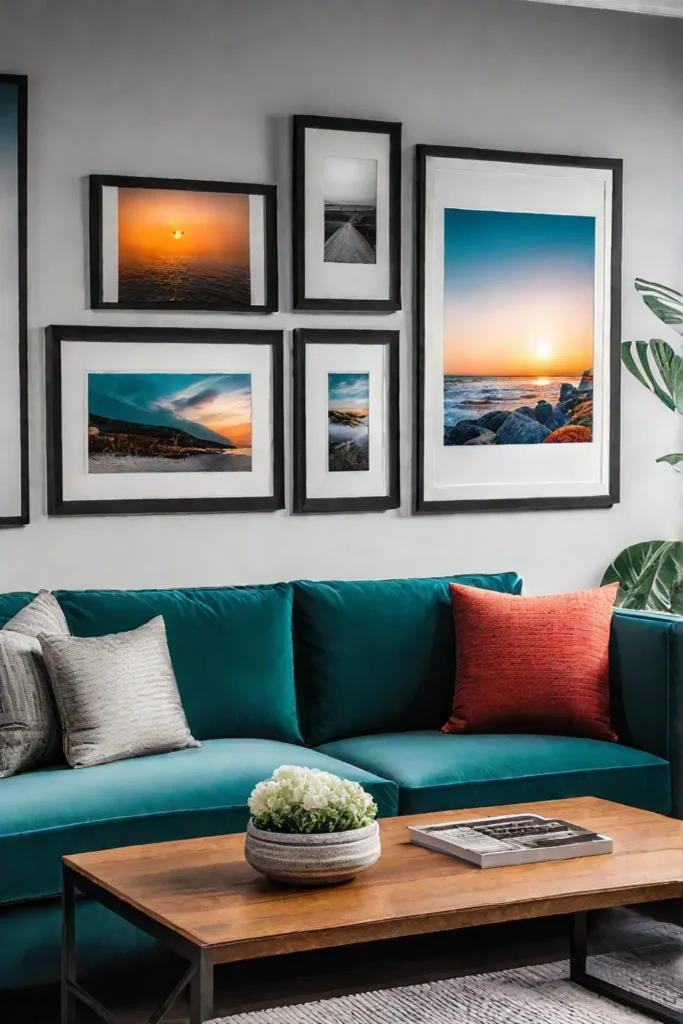
Showcase Your Style with a DIY Gallery Wall
A gallery wall is the perfect way to bring your living room to life and showcase your unique personality. By curating a collection of art prints, photographs, and personal mementos, you can create a visually striking display that tells your story.
Choosing a Theme and Curating Your Collection
The first step in creating a gallery wall is to decide on a theme that resonates with you. Whether it’s your love for travel, your family’s cherished memories, or your appreciation for a particular art movement, let your interests guide you in selecting pieces that speak to your soul.
As you curate your collection, don’t be afraid to mix and match different frame sizes, colors, and styles. This eclectic approach adds depth and character to your gallery wall, creating a dynamic and visually engaging display.
Tips for Arranging and Hanging Your Gallery Wall
Once you’ve gathered your pieces, it’s time to plan your layout. Use washi tape, craft paper, or printable templates to map out your desired arrangement on the floor or a large surface. This will help you visualize the overall composition and make adjustments before committing to the wall.
When hanging your frames, consider using a variety of hanging hardware, such as picture hooks, nails, and adhesive strips, to accommodate different frame weights and wall materials. Don’t be afraid to get creative with your layout – experiment with asymmetrical arrangements, overlapping frames, and incorporating negative space for a truly unique and personalized display.
Remember, a well-curated gallery wall can serve as a conversation starter and reflect your personality in a way that no other home decor element can. So, embrace your style, tell your story, and let your living room become a canvas for your creativity.
As you step back and admire your handiwork, you’ll be filled with a sense of pride and accomplishment, knowing that you’ve created a space that truly represents who you are.
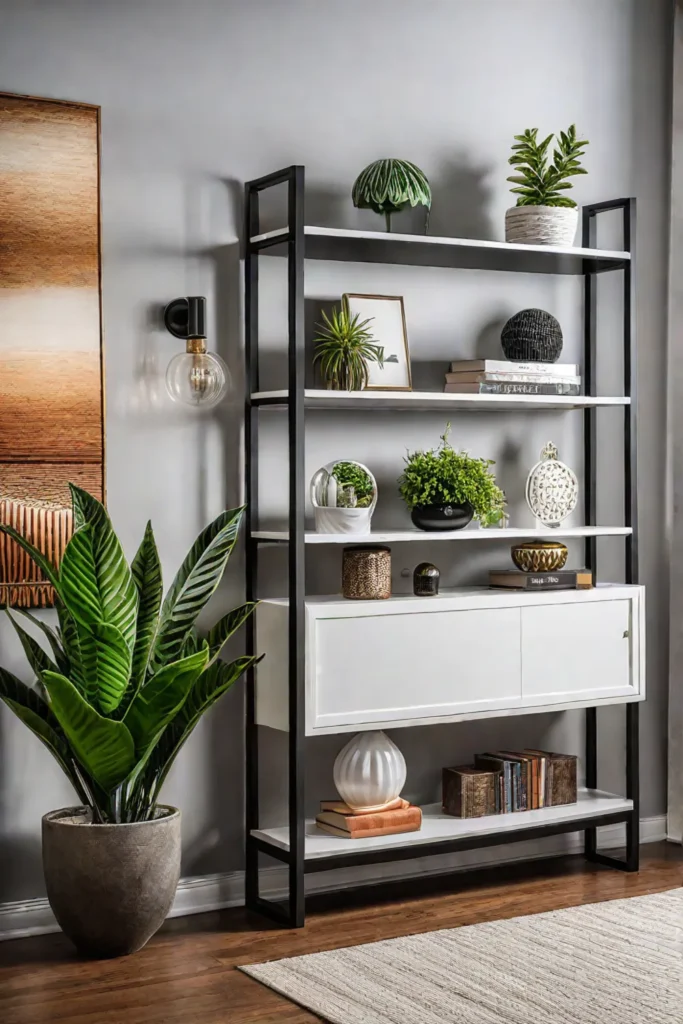
Functional and Stylish: DIY Shelving for Display and Storage
Shelving units are a versatile addition to any living room, serving as both functional storage solutions and stylish displays for your favorite decor pieces. With a little creativity and some basic DIY skills, you can craft unique and personalized shelves that perfectly complement your space.
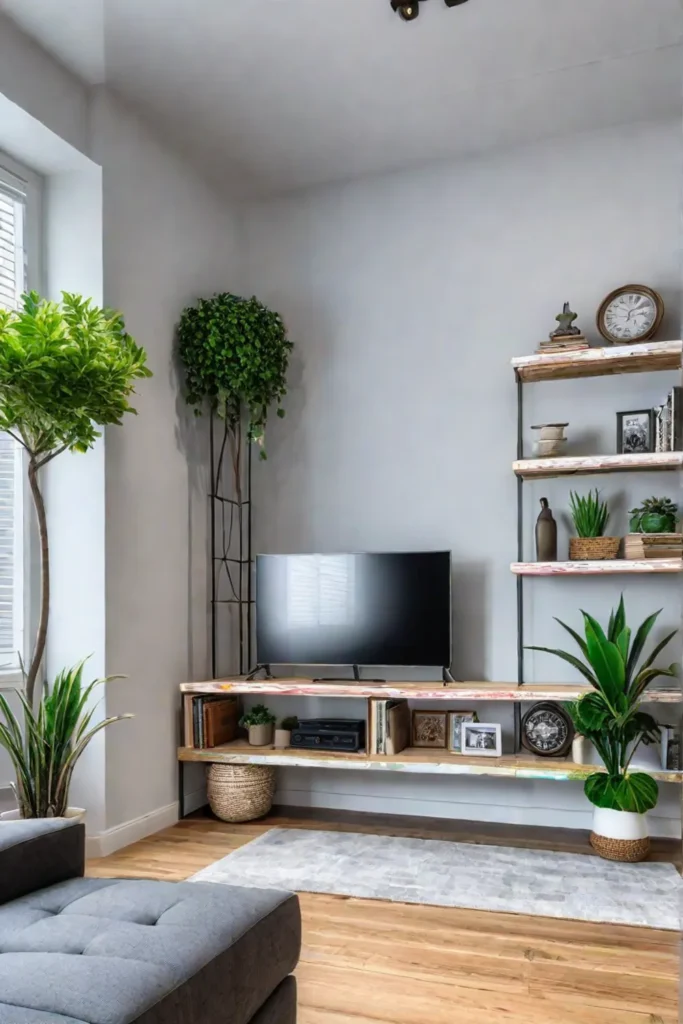
Choosing the Right Shelving Type for Your Needs
The first step in your DIY shelving project is to determine the purpose and location of your shelves. Are you looking for open shelving to showcase your book collection or decorative items? Or do you need closed storage for a more organized look? Consider floating shelves above a sofa or desk for a minimalist display, or opt for wall-mounted crates or repurposed ladders for a rustic, industrial vibe.
Styling Your Shelves with Decor and Personal Touches
Once you’ve installed your shelves, it’s time to style them with your favorite decor pieces and personal touches. Start by grouping items by color, texture, or theme for a cohesive look. Mix and match different heights and shapes to create visual interest and depth. Incorporate plants, books, and framed artwork to add pops of color and life to your shelves.
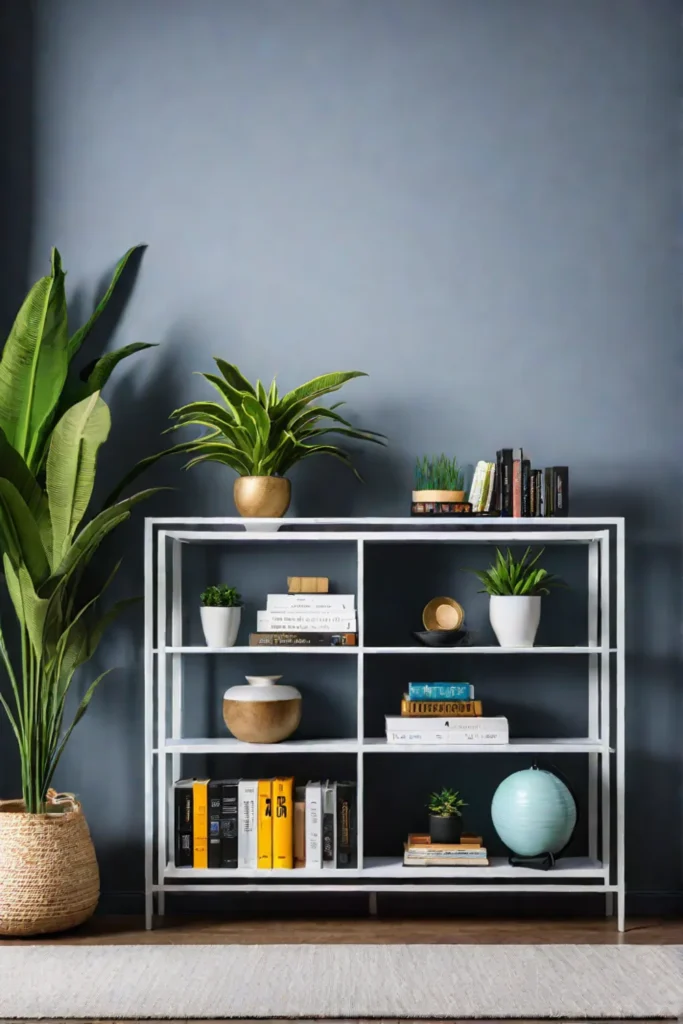
Don’t be afraid to get creative with your styling! Repurpose vintage finds or unique objects as bookends or decorative accents. And remember, less is often more – leave some negative space to prevent your shelves from looking cluttered.
Practical Tips for DIY Shelving Success
- For a sturdy and secure installation, use appropriate hardware and follow the manufacturer’s instructions carefully.
- Consider the weight capacity of your shelves and distribute heavier items evenly for safety.
- Softwood options like pine or cedar are affordable and easy to work with for DIY shelving projects.
- Scour thrift stores, flea markets, or online marketplaces for unique and inexpensive shelving materials like reclaimed wood or vintage crates.
- Draw inspiration from home decor magazines, Pinterest boards, or Instagram accounts dedicated to stylish shelving displays.
By incorporating functional and stylish DIY shelving into your living room, you’ll not only create ample storage space but also add a personal touch that reflects your unique style and taste.
As we wrap up our exploration of budget-friendly DIY wall art projects, it’s clear that transforming your living room into a personalized and inviting space is well within reach. With a little creativity and some basic materials, you can create stunning pieces that not only enhance your decor but also serve as conversation starters and expressions of your unique style.
Conclusion
As we bid farewell to our exploration of budget-friendly DIY wall art projects, it’s evident that the true beauty of these creations lies in their ability to transform a living space into a reflection of your unique personality and life experiences. Whether you’ve mastered the intricate art of macrame, unleashed your inner painter on a canvas, or woven together a tapestry of fabrics and memories, each piece you’ve crafted is a testament to your creativity and individuality.

Remember, these projects are not mere decorations but living expressions of your journey, imbued with the stories and emotions that make your living room a sanctuary. As you admire your handiwork, let each piece serve as a reminder of the power of self-expression and the joy that comes from creating something truly your own.
So, embrace your creativity, celebrate your achievements, and let your living room be a canvas upon which you paint the vibrant hues of your life’s narrative. In the end, it is these personal touches that transform a house into a home, a space that not only shelters but also nourishes the soul.